Selling a digital product is exciting until the first customer actually pays. Then a very practical question comes up: where does the money go, and how do you get it?
When I first looked at Payhip, I noticed that the platform itself is only one part of the payment process. Payhip handles the storefront and checkout experience, while payment processors such as PayPal or Stripe handle the actual payment. That distinction makes the whole process much easier to understand.
If you are selling ebooks, PDFs, templates, online courses, software, printables, or other digital products through Payhip, this guide explains how getting paid works, how to connect a payment provider, what happens after a customer buys something, and what can cause payment problems.
How Payhip Payments Work
Payhip does not work exactly like a traditional bank account where your customers send money directly to Payhip and you later withdraw it.
Instead, you normally connect a supported payment processor to your Payhip store. Depending on your location and eligibility, this can include services such as PayPal or Stripe.
The basic process looks like this:
Customer visits your Payhip store → Customer checks out → Payment processor processes the payment → Money becomes available through the connected payment account → Customer receives the product.
For example, suppose you sell a $10 Canva template.
A customer opens your Payhip product page and clicks the purchase button. At checkout, they complete the payment using the payment methods supported by your connected processor. After the payment is successfully processed, Payhip delivers the digital product according to your product settings.
The important point is that Payhip and your payment processor have different jobs.
Payhip provides the storefront, product delivery, checkout integration, and sales management features. The payment provider handles the financial transaction and makes the funds available according to its own policies.
Step 1: Create Your Payhip Account
Before worrying about receiving money, create your Payhip account.
You can do this from a desktop browser such as Chrome or Edge. You can also manage many parts of your store from a phone, but I recommend using a laptop or desktop when setting up payment information because it is easier to check account settings and verification requirements.
After creating your account, complete the basic store information.
You will generally want to have:
- A store name
- Your email address
- A profile or business name
- At least one product
- A product price
- A payment method connected to your store
Don’t rush into advertising your store before testing the checkout process.
A common beginner mistake is spending several days creating products and social media posts before checking whether customers can actually complete a payment.
Step 2: Add a Product
Before you can make money, you need something to sell.
Payhip can be used for different types of digital products, including:
- Ebooks
- PDF guides
- Printable planners
- Canva templates
- Design resources
- Software
- Music and other digital files
- Online courses
- Membership-based content
Let’s use a simple example.
Imagine you create a PDF called “Beginner’s Excel Workbook” and decide to sell it for $7.
You upload the PDF to your Payhip store, enter the product title and description, add a product image, and set the price.
Take a moment to check the file before publishing it. Open the PDF on your Windows computer and also check it on your phone. A file that looks perfect on a laptop can sometimes have formatting problems on a smaller screen.
Step 3: Connect a Payment Processor
This is the most important part if your goal is to get paid.
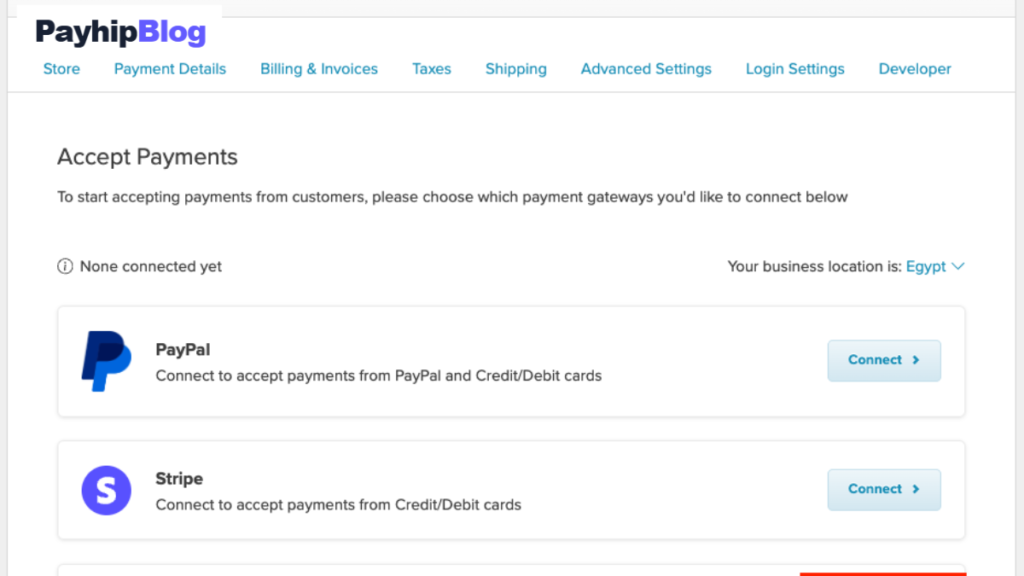
From your Payhip account, go to the area related to payment settings or payment methods. Payhip will show the payment providers available to you based on your account and location.
Two names you may commonly encounter are:
PayPal
and
Stripe
The exact availability can depend on your country, account eligibility, and current Payhip/payment-provider requirements.
When connecting one of these services, Payhip may redirect you to the payment provider’s website. You may need to sign in, create an account, or complete verification.
Don’t enter random information simply to get through the setup.
Your name, business details, address, email, and other information should match the requirements of the payment provider. Payment services can request additional verification before allowing withdrawals or certain transactions.
PayPal: How Getting Paid Works
If PayPal is available for your Payhip account, customers can pay through the payment methods supported by PayPal.
You first need a suitable PayPal account and then connect it to Payhip.
A simple example would be:
You sell a $15 ebook.
A customer purchases the ebook through your Payhip checkout. PayPal processes the transaction. The payment is associated with your PayPal account, subject to PayPal’s normal payment processing and account policies.
You can then manage the funds from PayPal according to the withdrawal methods available in your country.
One thing beginners sometimes misunderstand is that receiving a payment does not necessarily mean the money is immediately transferable to their bank account. Payment providers can apply holds, reviews, reserves, fees, or other restrictions depending on the transaction and account.
So don’t treat the displayed sales amount in your Payhip dashboard as exactly the same thing as money already sitting in your bank account.
Stripe: How Getting Paid Works
Stripe is another payment processor that may be available to eligible Payhip sellers.
The basic idea is similar.
You connect your Stripe account to Payhip, and Stripe processes eligible customer payments. Funds are then handled through your Stripe account and paid out according to Stripe’s payout schedule and requirements.
For example, suppose you sell five $20 products.
Your gross sales would be:
5 × $20 = $100
That does not necessarily mean you receive exactly $100 in your bank account.
There can be payment-processing fees, taxes, refunds, currency conversion costs, or other deductions depending on your circumstances.
This is why I recommend keeping a simple spreadsheet when starting.
You can record:
| Date | Product | Sale Price | Fees | Refunds | Net Amount |
|---|---|---|---|---|---|
| Sept 10 | Excel Workbook | $7 | — | $0 | — |
| Sept 11 | Canva Template | $12 | — | $0 | — |
| Sept 13 | PDF Guide | $9 | — | $0 | — |
You can fill in the actual amounts from your payment processor rather than guessing.
What Happens After Someone Buys Your Product?
Once everything is connected correctly, the process can be surprisingly simple.
Let’s say you sell a $10 printable planner.
A customer discovers your Payhip store through Google, Pinterest, Instagram, Facebook, or another source.
They open the product page and decide to buy it.
The customer completes checkout.
The payment processor confirms the transaction.
Payhip records the sale and provides access to the digital product based on your product configuration.
The payment then follows the payment processor’s normal processing and payout procedures.
From the seller’s perspective, you should be able to monitor your sales and payment activity instead of manually sending every file to every customer.
This is one of the reasons digital products can be easier to manage than physical products. You don’t have to print a PDF, put it in a box, buy a shipping label, and take it to a courier after every order.
Do You Get Paid Immediately?
Not necessarily.
This is one of the biggest misconceptions beginners have.
There are several different stages:
Customer payment
The customer successfully pays.
Payment processing
The payment provider processes or reviews the transaction.
Available balance
The funds become available according to the provider’s rules.
Payout
The provider sends eligible funds to your connected bank account or other supported withdrawal method.
These stages don’t always happen at exactly the same time.
For example, if you make your first sale today, you should not automatically assume that the money will appear in your bank account within a few minutes.
Your payment provider’s verification status, payout schedule, transaction type, currency, country, and account history can all matter how to get paid on Payhip.
How to Get Paid if You’re Selling from Pakistan
This is particularly important for sellers outside the United States and other countries where popular payment services have different levels of availability.
If you are operating from Pakistan, don’t create an account using another person’s identity or a fake foreign address simply because you saw a tutorial recommending it.
That can create serious account and payment problems later.
Instead, check which payment processors Payhip currently makes available to your account and which services legally support your location.
Payment availability can change over time, so always check the current requirements of the payment provider itself before building your entire business around it how to get paid on Payhip.
Your payment setup should be based on:
- Your actual country
- Your legal identity or business information
- Your available bank account
- Supported currencies
- Payment-provider availability
- Verification requirements
- Withdrawal options
This may take a little longer at the beginning, but it is much better than having money trapped in an account because the account information cannot be verified.
Why a Payhip Sale Might Not Appear as Expected
There are several reasons a new seller might think something is wrong.
The payment account isn’t connected correctly
Check your Payhip payment settings and confirm that the intended processor is actually connected.
Don’t assume that creating a PayPal or Stripe account automatically connects it to Payhip.
Your payment provider needs verification
A payment provider may ask you to verify your identity, address, bank details, or business information.
Check the provider’s dashboard and email notifications.
The customer didn’t complete checkout
Someone saying, “I tried to buy your ebook,” doesn’t necessarily mean a successful payment occurred.
Look for a completed transaction rather than relying on a screenshot of a checkout page.
The transaction was refunded
A customer can purchase a product and later receive a refund. Your sales records and payment balance should therefore be checked together.
Currency creates confusion
You might advertise a product in one currency while the payment provider processes or displays amounts differently.
Always check which currency you’re using for your product and payment account.
A Mistake I Would Avoid: Testing With Real Money
When setting up a new digital store, don’t immediately send advertisements to hundreds of people.
First, test the customer journey.
Open your store from another browser or device.
Check:
- Product page
- Product price
- Checkout
- Payment options
- Confirmation
- Product delivery
- Email notifications
- Seller dashboard
For example, you can open your store on Chrome on your Windows laptop and then check the customer-facing page from your Android phone.
Look for obvious problems.
Is the product description understandable?
Does the product image load?
Is the price correct?
Does the checkout page make sense?
Can the customer access the product after payment?
Small problems become much more frustrating when you discover them after sending paid traffic to the store.
Don’t Forget Payment Fees
Another beginner mistake is calculating profit by looking only at the product price how to get paid on Payhip.
Suppose you sell a template for $20.
You might think:
10 sales × $20 = $200 profit
But $200 is gross revenue, not necessarily your final profit how to get paid on Payhip.
You may have:
- Payment processing fees
- Refunds
- Currency conversion costs
- Advertising expenses
- Software subscriptions
- Design costs
- Taxes or other applicable obligations
A simple profit calculation is:
Revenue − fees − refunds − business expenses = approximate profit
Keeping these numbers separate will make your business much easier to understand how to get paid on Payhip.
What If a Customer Asks Where Their Money Went?
As a seller, avoid telling customers that you personally control their payment processing if you don’t.
If a customer’s payment appears incomplete, declined, pending, or reversed, check the transaction information available to you and direct them to the appropriate payment provider when necessary.
For example, if a customer says their bank was charged but the order wasn’t completed, don’t immediately promise a second download or another charge how to get paid on Payhip.
First verify the order status.
This protects both you and the customer from accidental duplicate transactions.
Keep Your Payhip Store Professional
Getting paid is only one part of running a digital store.
Your product page should answer basic questions before someone reaches checkout how to get paid on Payhip.
Explain:
- What the customer receives
- File format
- Number of files
- Compatibility
- How the product is delivered
- Whether the product is editable
- Software requirements
- License restrictions
- Refund conditions where applicable
For example, if you’re selling a Canva template, tell customers that they need access to Canva if that is required.
If you’re selling an Excel workbook, mention whether Microsoft Excel is required and whether the file works with other spreadsheet applications how to get paid on Payhip.
Clear product descriptions can reduce unnecessary customer support messages.
Keep Your Payment Accounts Secure
Your payment account deserves the same attention as your bank account how to get paid on Payhip.
Use a strong, unique password.
Enable two-factor authentication when available.
Don’t share login codes with someone claiming to be PayPal, Stripe, Payhip, or a customer.
Be especially careful with emails saying things like:
“Your Payhip payment is waiting. Click here to verify your account.”
Instead of clicking a suspicious email link, open the relevant service directly in your browser and check your account.
This simple habit can protect you from phishing attempts how to get paid on Payhip.
What I Would Check Before Launching
If I were setting up a new Payhip store today, I’d make a small checklist before promoting it how to get paid on Payhip:
- Product uploaded correctly
- Product price checked
- Payment processor connected
- Payment account verified
- Bank/payout information completed where required
- Product delivery tested
- Store viewed on mobile
- Product description proofread
- Refund/customer-support information prepared
- Sales and expenses tracked separately
I would also keep screenshots or records of important setup information, but I would never store passwords or payment credentials in an ordinary spreadsheet how to get paid on Payhip.
Can You Sell Without a Website?
Yes, one of the useful things about a platform such as Payhip is that you don’t necessarily need to build a complete ecommerce website from scratch before selling a digital product.
You can promote your store through channels such as social media, email, Pinterest, YouTube, or your existing website.
For example, a small YouTube channel about Excel could create an Excel budgeting template and link viewers to the product page.
A designer could sell social-media templates how to get paid on Payhip.
A student could create an original study planner.
A blogger could sell a detailed PDF guide related to a topic they genuinely understand.
The important part is that the product should provide genuine value and be legally yours to sell how to get paid on Payhip.
A Simple Example From Product Creation to Payment
Imagine you create a $9 PDF called “Beginner Excel Practice Workbook.”
You create the workbook in Microsoft Excel, export the final version as a PDF, and upload it to Payhip how to get paid on Payhip.
You create a clear product description explaining exactly what buyers receive how to get paid on Payhip.
You connect an eligible payment processor.
Then you publish the product.
A customer finds your product through your website.
They visit the Payhip checkout page and complete payment.
Payhip records the order and provides the product according to your delivery settings how to get paid on Payhip.
The payment provider processes the transaction.
The funds become available according to the provider’s rules and payout schedule.
You then record the transaction in your spreadsheet and continue creating useful products how to get paid on Payhip.
That is the basic cycle.
The technology is relatively straightforward. The harder part is creating something people actually want and making the buying process trustworthy and easy to understand how to get paid on Payhip.
Final Thoughts
Getting paid on Payhip is mainly about understanding the relationship between your Payhip store and the payment processor connected to it. Payhip provides the selling environment, while the payment provider handles the financial side of the transaction.
Before promoting your first product, take the time to verify your payment account, check payout requirements, test your checkout, and make sure your personal or business information is accurate. These steps may feel boring compared with designing a product or posting it on social media, but they can prevent much bigger problems later how to get paid on Payhip.
Most importantly, don’t judge your store only by the number of sales shown on a dashboard. Track actual fees, refunds, payouts, and expenses as well. Once you have that habit, you’ll have a much clearer picture of what you’re really earning from each digital product.
Next Read:how to connect Stripe to Payhip